ROSA with hosted control planes Test Drive

I want to share the steps I used to create my ROSA with the hosted control planes (HCP) cluster.

Prerequisites

Installation Steps

  • Login to the AWS management console to enable the ROSA with HCP
  • Click “Get started.”
  • Click “Enable ROSA with HCP”
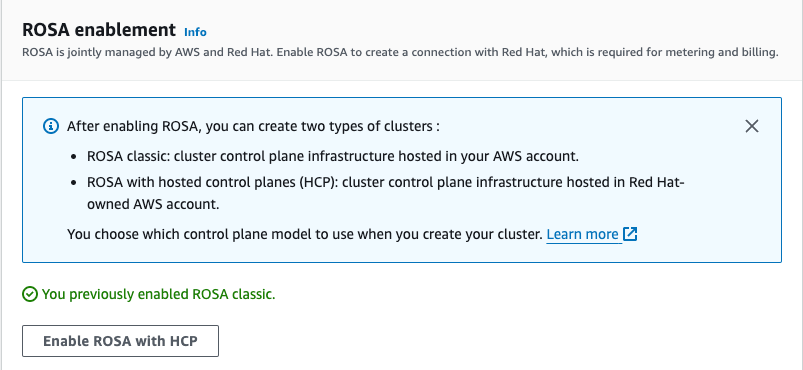
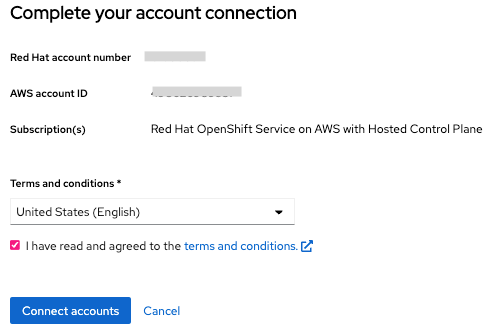
  • Connect to your AWS account
  • Open a terminal and run “rosa login” with your token from the link above using ROSA CLI.
$ rosa login --token="your_token_goes_here"
$ rosa create account-roles --mode auto
  • Create the Virtual Private Cloud using Terraform.
$ git clone https://github.com/openshift-cs/terraform-vpc-example
$ cd terraform-vpc-example
$ terraform init
$ terraform plan -out rosa.tfplan -var region=us-east-2 -var cluster_name=rosa-hcp

Note: If you want to create your own VPC for ROSA with HCP, you can replace this step with your VPC creation. The specific network requirements will be provided in the documentation referred to in the Reference section.

  • Run the following command.
$ terraform apply "rosa.tfplan"

output:

module.vpc.aws_eip.nat[0]: Creating...
module.vpc.aws_vpc.this[0]: Creating...
module.vpc.aws_eip.nat[0]: Creation complete after 0s [id=eipalloc-05b7778b52041c991]
module.vpc.aws_vpc.this[0]: Still creating... [10s elapsed]
module.vpc.aws_vpc.this[0]: Creation complete after 12s [id=vpc-02008794079e35f34]
module.vpc.aws_internet_gateway.this[0]: Creating...
module.vpc.aws_default_route_table.default[0]: Creating...
module.vpc.aws_route_table.public[0]: Creating...
module.vpc.aws_route_table.private[0]: Creating...
module.vpc.aws_subnet.public[0]: Creating...
...
Apply complete! Resources: 14 added, 0 changed, 0 destroyed.

Outputs:

cluster-private-subnets = [
"subnet-xxxxaa7e62b0cxxxx",
]
cluster-public-subnets = [
"subnet-xxxx9d32f9bfxxxx",
]
cluster-subnets-string = "subnet-xxxx9d32f9bfbxxxx,subnet-xxxxaa7e62b0cxxxx"
  • Make a note of the subnet IDs.
$ export SUBNET_IDS=$(terraform output -raw cluster-subnets-string)
  • Creating the account-wide STS roles and policies
$ rosa create account-roles --hosted-cp

output:

I: Logged in as 'shanna_chan' on 'https://api.openshift.com'
I: Validating AWS credentials...
I: AWS credentials are valid!
I: Validating AWS quota...
I: AWS quota ok. If cluster installation fails, validate actual AWS resource usage against https://docs.openshift.com/rosa/rosa_getting_started/rosa-required-aws-service-quotas.html
I: Verifying whether OpenShift command-line tool is available...
I: Current OpenShift Client Version: 4.13.5
I: Creating account roles
? Role prefix: ManagedOpenShift
? Permissions boundary ARN (optional):
? Path (optional):
? Role creation mode: auto
? Create Classic account roles: Yes
I: By default, the create account-roles command creates two sets of account roles, one for classic ROSA clusters, and one for Hosted Control Plane clusters.
In order to create a single set, please set one of the following flags: --classic or --hosted-cp
I: Creating classic account roles using
...
I: To create an OIDC Config, run the following command:
rosa create oidc-config

Notes: I used “ManagedOpenShift” as the account role prefix (default) in this example

  • Create OIDC config
$ rosa create oidc-config


interactive output:

? Would you like to create a Managed (Red Hat hosted) OIDC Configuration Yes
W: For a managed OIDC Config only auto mode is supported. However, you may choose the provider creation mode
? OIDC Provider creation mode: auto
I: Setting up managed OIDC configuration
I: To create Operator Roles for this OIDC Configuration, run the following command and remember to replace <user-defined> with a prefix of your choice:
rosa create operator-roles --prefix <user-defined> --oidc-config-id <oidc-config-id>
If you are going to create a Hosted Control Plane cluster please include '--hosted-cp'
I: Creating OIDC provider using 'arn:aws:iam::<acct-id>:user/shchan@redhat.com-nk2zr-admin'
? Create the OIDC provider? Yes
I: Created OIDC provider with ARN 'arn:aws:iam::<acct-id>:oidc-provider/rh-oidc.s3.us-east-1.amazonaws.com/<oidc-config-id>'

Notes:
<acct-id> and <oidc-config-id> are generated IDs from the command.

  • Set variable for OIDC_ID from the above output.
$ export OIDC_ID=<oidc-config-id>
  • List out all ODIC ID that is associated with your OCM login
$ rosa list oidc-config

Note: The newly created OIDC ID is listed here.

  • Create Operator roles
$ OPERATOR_ROLES_PREFIX=<prefix_name>
$ rosa create operator-roles --hosted-cp --prefix $OPERATOR_ROLES_PREFIX --oidc-config-id $OIDC_ID --installer-role-arn arn:aws:iam::000000000000:role/ManagedOpenShift-HCP-ROSA-Installer-Role

interactive output:

? Role creation mode: auto
? Operator roles prefix: demo
? Create hosted control plane operator roles: Yes
I: Using arn:aws:iam::000000000000:role/ManagedOpenShift-HCP-ROSA-Installer-Role for the Installer role
? Permissions boundary ARN (optional):
I: Reusable OIDC Configuration detected. Validating trusted relationships to operator roles:
I: Creating roles using ...
I: To create a cluster with these roles, run the following command:
rosa create cluster --sts --oidc-config-id oidc-config-id --operator-roles-prefix demo --hosted-cp

Where <prefix_name> can be anything and “installer-role-arn” value can be found from the output of the previous step.

  • Create ROSA with HCP cluster
$ rosa create cluster --sts --oidc-config-id $OIDC_ID --operator-roles-prefix demo --hosted-cp --subnet-ids $SUBNET_IDS


interactive output:

I: Enabling interactive mode
? Cluster name: rosa-hcp
? Deploy cluster with Hosted Control Plane: Yes
...
? External ID (optional):
? Operator roles prefix: demo
I: Reusable OIDC Configuration detected. Validating trusted relationships to operator roles:
? Tags (optional):
? AWS region: us-east-2
? PrivateLink cluster: No
? Machine CIDR: 10.0.0.0/16
? Service CIDR: 172.30.0.0/16
? Pod CIDR: 10.128.0.0/14
? Enable Customer Managed key: No
? Compute nodes instance type: m5.xlarge
? Enable autoscaling: No
? Compute nodes: 2
? Host prefix: 23
? Enable FIPS support: No
? Encrypt etcd data: No
? Disable Workload monitoring: No
? Use cluster-wide proxy: No
? Additional trust bundle file path (optional):
? Enable audit log forwarding to AWS CloudWatch: No
I: Creating cluster 'rosa-hcp'
I: To create this cluster again in the future, you can run:
rosa create cluster --cluster-name rosa-hcp --sts --role-arn arn:aws:iam::<account-id>:role/ManagedOpenShift-HCP-ROSA-Installer-Role --support-role-arn arn:aws:iam::<account-id>:role/ManagedOpenShift-HCP-ROSA-Support-Role --worker-iam-role arn:aws:iam::<account-id>:role/ManagedOpenShift-HCP-ROSA-Worker-Role --operator-roles-prefix demo --oidc-config-id <oidc-config-id> --region us-east-2 --version 4.14.4 --replicas 2 --compute-machine-type m5.xlarge --machine-cidr 10.0.0.0/16 --service-cidr 172.30.0.0/16 --pod-cidr 10.128.0.0/14 --host-prefix 23 --subnet-ids subnet-<subnet-ids> --hosted-cp
I: To view a list of clusters and their status, run 'rosa list clusters'
I: Cluster 'rosa-hcp' has been created.
I: Once the cluster is installed you will need to add an Identity Provider before you can login into the cluster. See 'rosa create idp --help' for more information.

...

I: When using reusable OIDC Config and resources have been created prior to cluster specification, this step is not required.
Run the following commands to continue the cluster creation:

rosa create operator-roles --cluster rosa-hcp
rosa create oidc-provider --cluster rosa-hcp

I: To determine when your cluster is Ready, run 'rosa describe cluster -c rosa-hcp'.
I: To watch your cluster installation logs, run 'rosa logs install -c rosa-hcp --watch'.

Note: If you are installing ROSA with HCP the first time and failing on the cluster creation, please check out the Troubleshooting section.
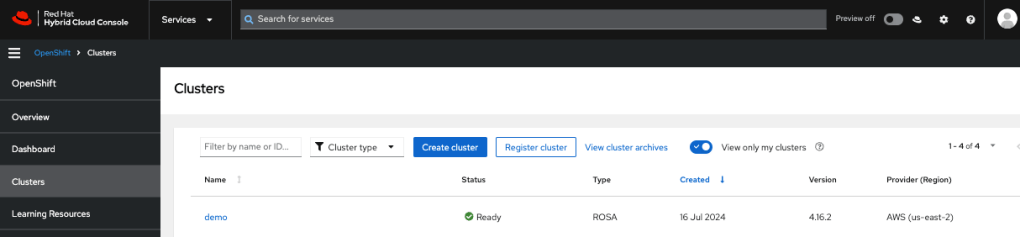
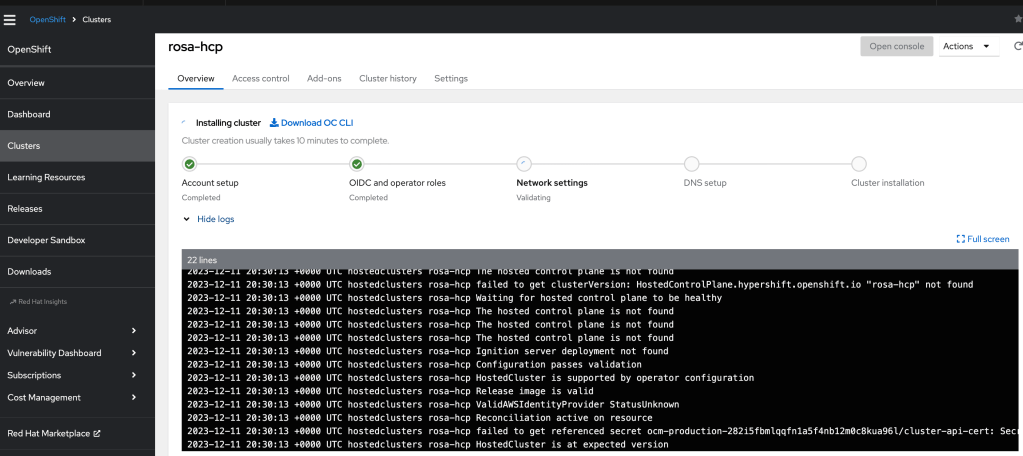
  • Click on to the cluster name and view logs or run run ‘rosa logs install -c rosa-hcp –watch’ in the CLI
  • You can also check how many EC2 instances are created under your AWS account.
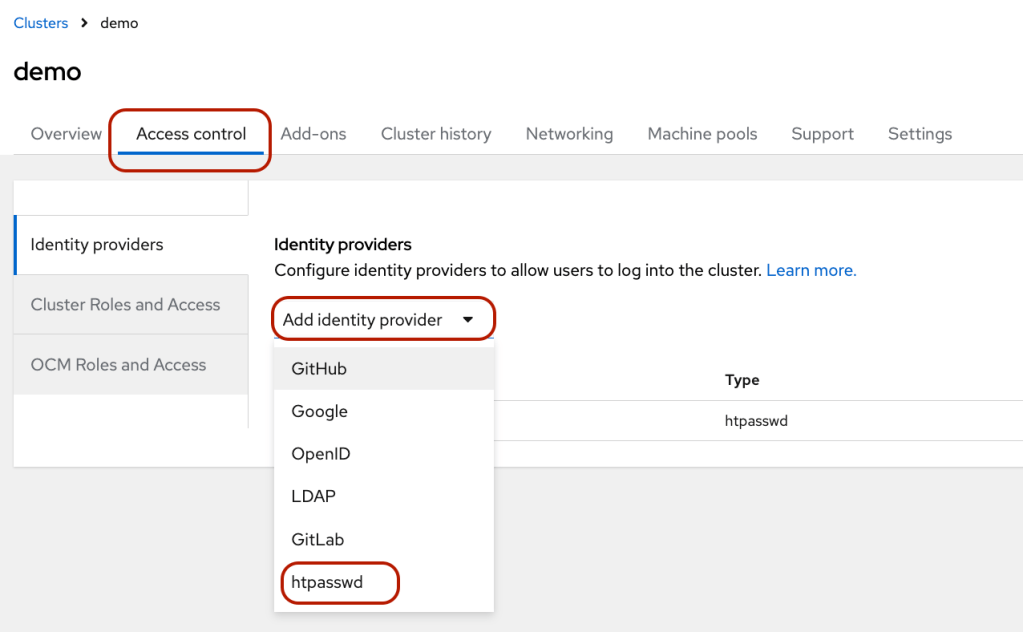
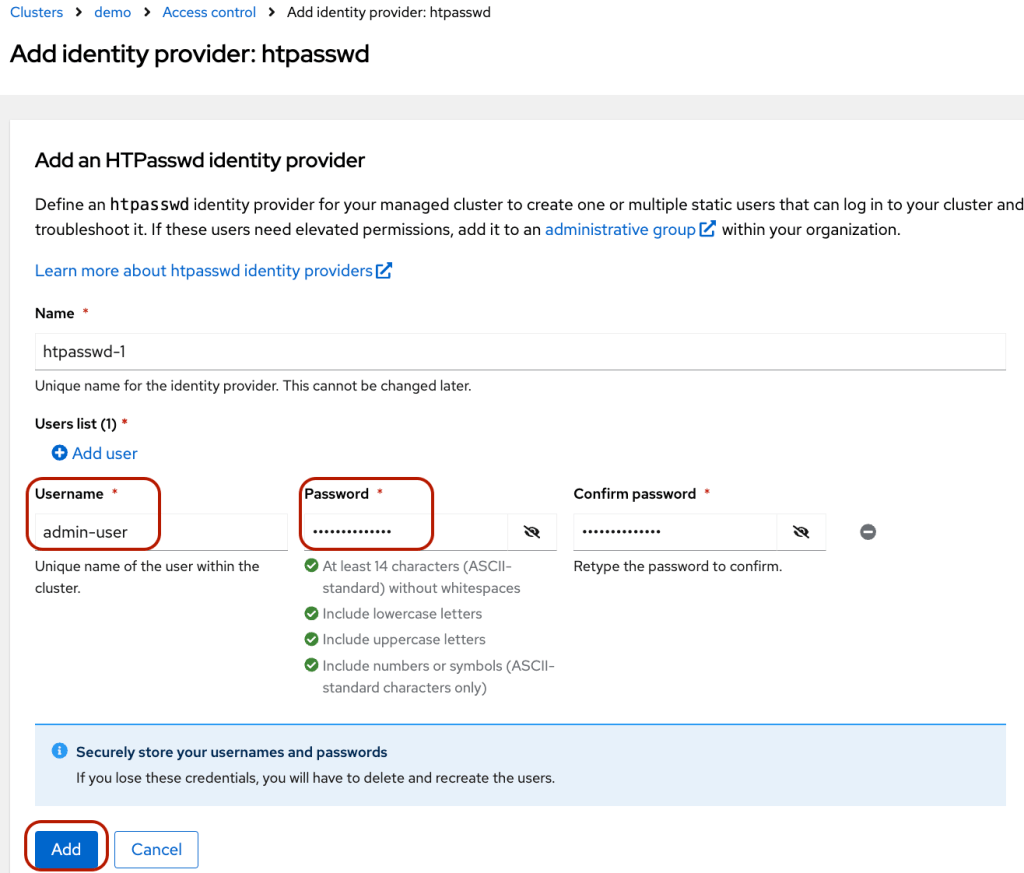
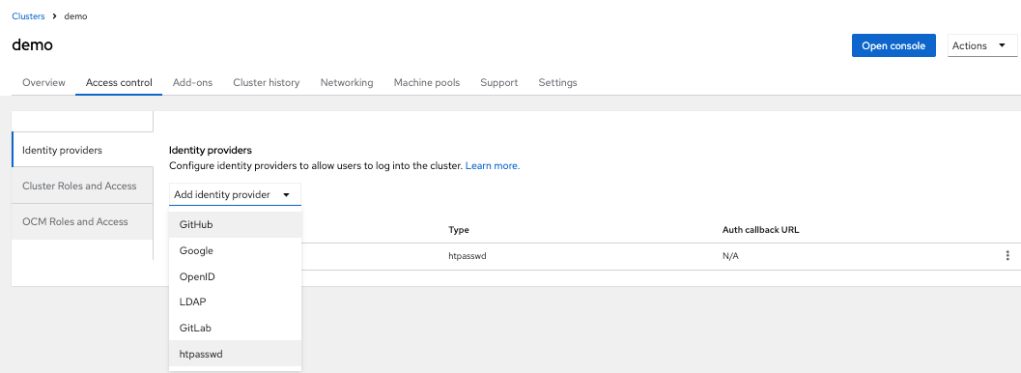
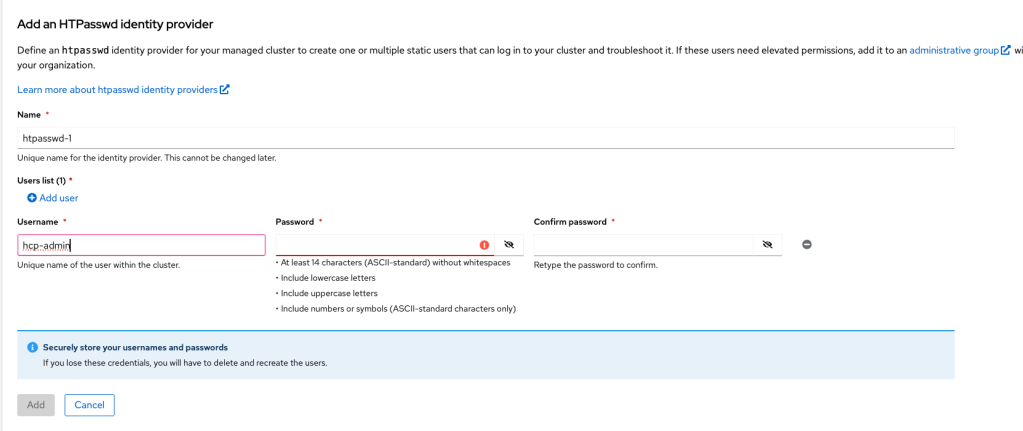
  • Once the installation is completed, you can create identity providers via the “Access control” tab. I added the user via “htpasswd.”
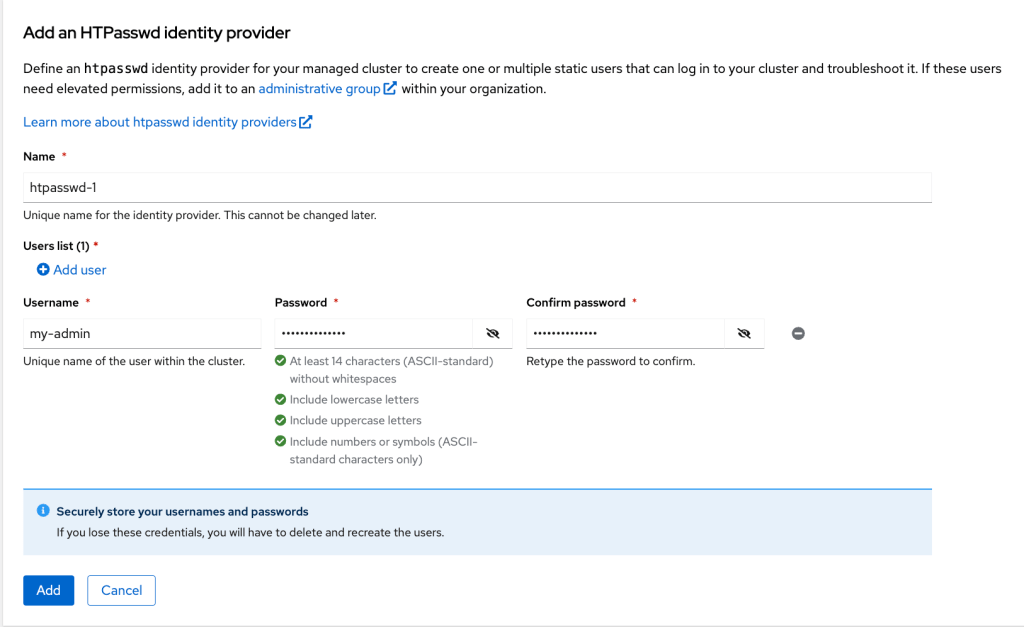
  • Create a user by clicking “htpasswd.”
  • Enter username and password. Then, click “Add.”
  • Click the blue “Open Console” button to access the OpenShift.
  • Log in to the console using the newly created username.

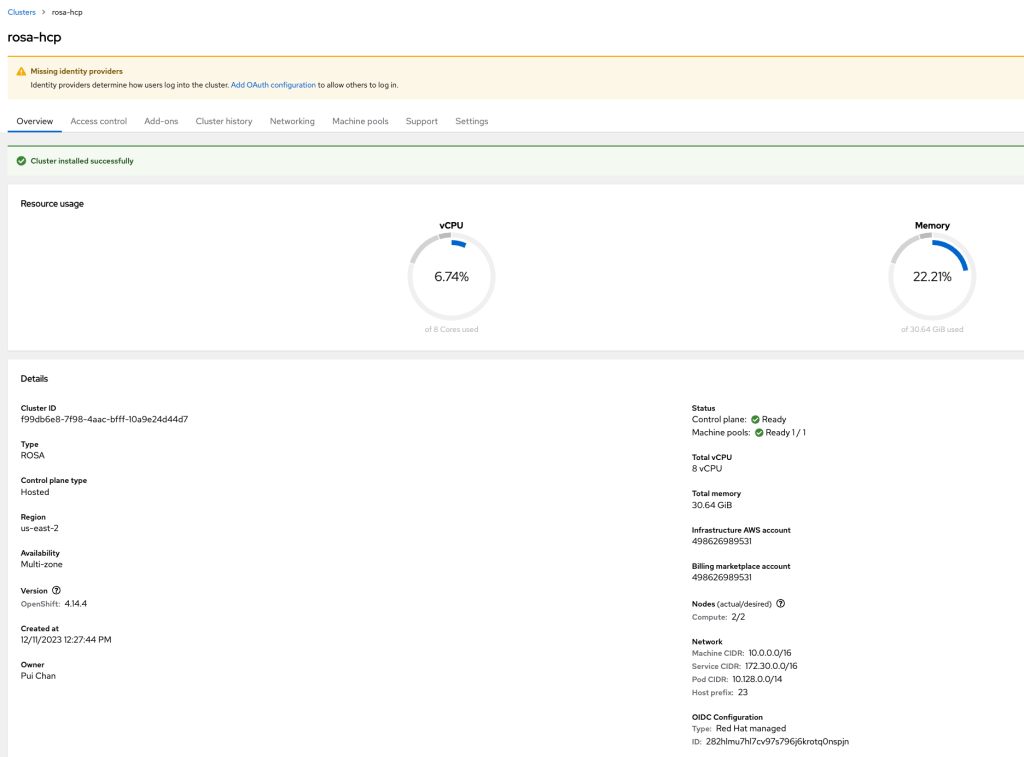
The cluster is ready for deploying applications.

Troubleshooting

  • Get the following error when creating the cluster.
E: Failed to create cluster: Account <ocm-user-account> missing required RedhatManagedCluster create permission

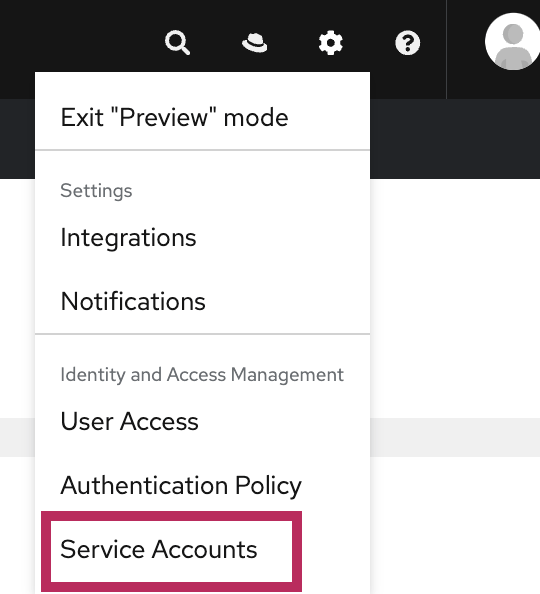
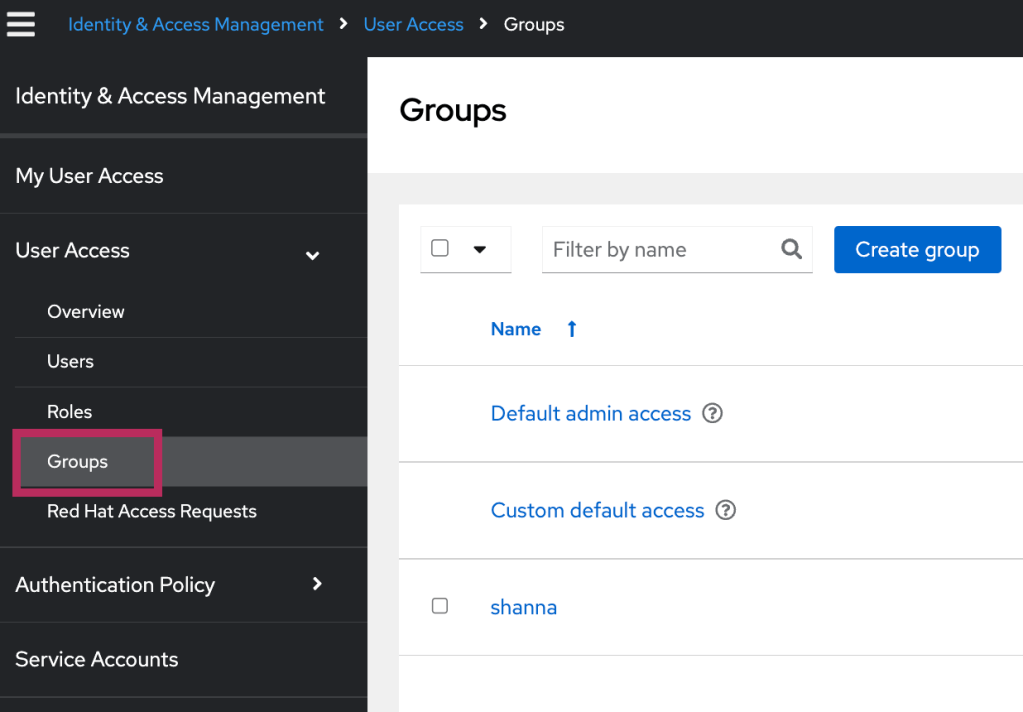
The solution is to add “OCM Cluster Provisioner” and “OCM Cluster Viewer” roles to the “Custom default access” group from https://console.redhat.com/iam/user-access/groups

References

OpenShift Extended Update Support (EUS)

Something I recently learned from testing the EUS to EUS process, and I like to share the steps here. Starting OpenShift Container Platform (OCP) 4.12, Red hat is adding an additional 6 months of Extended Update Support (EUS) on even-numbered OCP release for the x86_64 architecture.

We can upgrade from a EUS version to the next EUS version with only a single reboot of non-control plane hosts. There are caveats that are listed in the reference section below.

Steps to upgrade from 4.10.x to 4.12 using the EUS-to-EUS upgrade

  • Verify that all machine config pools display a status of Up to date and that no machine config pool displays a status of “UPDATING.”
  • Set your channel to eus-<4.y+2>
  • The channel is set to eus-4.12
  • Pause all worker machine pools except for the master machine pool
  • Update 4+1 only with Partial cluster update
  • Wait for the partial upgrade to complete
  • Make sure the partial update is completed
  • No reboot for workers as noted that workers are paused on the K8S v 1.23
  • Check the OCP console
  • Check the KCS ​​https://access.redhat.com/articles/6955381. Review the k8s API version update and ensure the workloads are working properly and will be using the newly updated K8S API version.
  • Execute the following command:
    oc -n openshift-config patch cm admin-acks --patch '{"data":{"ack-4.11-kube-1.25-api-removals-in-4.12":"true"}}' --type=merge
  • OCP console shows
  • Click resume all updates
  • Double-check all machine pools. If updating, please wait for it to complete.
  • Upgrade completed and now showing OCP 4.12 (K8S v1.25)

Reference:

Installing OpenShift using Temporary Credentials

One of the most frequently asked questions recently is how to install OpenShift on AWS with temporary credentials. The default OpenShift provisioning using AWS key and secret, which requires the Administrator privileges. The temporary credential often refers to AWS Security Token Service (STS), which allows end-users to assume an IAM role resulting in short-lived credentials.

Developers or platform teams will require approval from their security team to access the company AWS account. It can be challenging in some organizations to get access to Administrator privileges.

OpenShift 4.7 support for AWS Secure Token Service in manual mode is in Tech Preview. I decided to explore a little deeper—the exercise based on the information both on the OpenShift documentation and the upstream repos. I am recording the notes from my test run. I hope you will find it helpful.

OpenShift 4 version

OCP 4.7.9

Build sts-preflight binary

git clone https://github.com/sjenning/sts-preflight.git
go get github.com/sjenning/sts-preflight
cd <sts-preflight directory>
go build .

Getting the AWS STS

As an AWS administrator, I found the sts-preflight tool helpful in this exercise. The documentation has the manual steps, but I choose to use the sts-preflight tool here.

  • Create STS infrastructure in AWS:
./sts-preflight  create --infra-name <sts infra name> --region <aws region>

# ./sts-preflight  create --infra-name sc-example --region us-west-1
2021/04/28 13:24:42 Generating RSA keypair
2021/04/28 13:24:56 Writing private key to _output/sa-signer
2021/04/28 13:24:56 Writing public key to _output/sa-signer.pub
2021/04/28 13:24:56 Copying signing key for use by installer
2021/04/28 13:24:56 Reading public key
2021/04/28 13:24:56 Writing JWKS to _output/keys.json
2021/04/28 13:24:57 Bucket sc-example-installer created
2021/04/28 13:24:57 OIDC discovery document at .well-known/openid-configuration updated
2021/04/28 13:24:57 JWKS at keys.json updated
2021/04/28 13:24:57 OIDC provider created arn:aws:iam::##########:oidc-provider/s3.us-west-1.amazonaws.com/sc-example-installer
2021/04/28 13:24:57 Role created arn:aws:iam::##########:role/sc-example-installer
2021/04/28 13:24:58 AdministratorAccess attached to Role sc-example-installer
  • Create an OIDC token:
# ./sts-preflight token
2021/04/28 13:27:06 Token written to _output/token
  • Get STS credential:
# ./sts-preflight assume
Run these commands to use the STS credentials
export AWS_ACCESS_KEY_ID=<temporary key>
export AWS_SECRET_ACCESS_KEY=<temporary secret>
export AWS_SESSION_TOKEN=<session token>
  • The above short-lived key, secret, and token can be given to the person who are installing OpenShift.
  • Export all the AWS environment variables before proceeding to installation.

Start the Installation

As a Developer or OpenShift Admin, you will get the temporary credentials information and export the AWS environment variables before installing the OCP cluster.

# oc adm release extract quay.io/openshift-release-dev/ocp-release:4.7.9-x86_64 --credentials-requests --cloud=aws --to=./credreqs ; cat ./credreqs/*.yaml > credreqs.yaml
  • Create install-config.yaml for installation:
# ./openshift-install create install-config --dir=./sc-sts
? SSH Public Key /root/.ssh/id_rsa.pub
? Platform aws
INFO Credentials loaded from default AWS environment variables
? Region us-east-1
? Base Domain sc.ocp4demo.live
? Cluster Name sc-sts
? Pull Secret [? for help] 
INFO Install-Config created in: sc-sts
  • Make sure that we install the cluster in Manual mode:
# cd sc-sts
# echo "credentialsMode: Manual" >> install-config.yaml
  • Create install manifests:
# cd ..
# ./openshift-install create manifests --dir=./sc-sts
  • Using the sts-preflight tool to create AWS resources. Make sure you are in the sts-preflight directory:
#./sts-preflight create --infra-name sc-example --region us-west-1 --credentials-requests-to-roles ./credreqs.yaml
2021/04/28 13:45:34 Generating RSA keypair
2021/04/28 13:45:42 Writing private key to _output/sa-signer
2021/04/28 13:45:42 Writing public key to _output/sa-signer.pub
2021/04/28 13:45:42 Copying signing key for use by installer
2021/04/28 13:45:42 Reading public key
2021/04/28 13:45:42 Writing JWKS to _output/keys.json
2021/04/28 13:45:42 Bucket sc-example-installer already exists and is owned by us
2021/04/28 13:45:42 OIDC discovery document at .well-known/openid-configuration updated
2021/04/28 13:45:42 JWKS at keys.json updated
2021/04/28 13:45:43 Existing OIDC provider found arn:aws:iam::000000000000:oidc-provider/s3.us-west-1.amazonaws.com/sc-example-installer
2021/04/28 13:45:43 Existing Role found arn:aws:iam::000000000000:role/sc-example-installer
2021/04/28 13:45:43 AdministratorAccess attached to Role sc-example-installer
2021/04/28 13:45:43 Role arn:aws:iam::000000000000:role/sc-example-openshift-machine-api-aws-cloud-credentials created
2021/04/28 13:45:43 Saved credentials configuration to: _output/manifests/openshift-machine-api-aws-cloud-credentials-credentials.yaml
2021/04/28 13:45:43 Role arn:aws:iam::000000000000:role/sc-example-openshift-cloud-credential-operator-cloud-credential- created
2021/04/28 13:45:44 Saved credentials configuration to: _output/manifests/openshift-cloud-credential-operator-cloud-credential-operator-iam-ro-creds-credentials.yaml
2021/04/28 13:45:44 Role arn:aws:iam::000000000000:role/sc-example-openshift-image-registry-installer-cloud-credentials created
2021/04/28 13:45:44 Saved credentials configuration to: _output/manifests/openshift-image-registry-installer-cloud-credentials-credentials.yaml
2021/04/28 13:45:44 Role arn:aws:iam::000000000000:role/sc-example-openshift-ingress-operator-cloud-credentials created
2021/04/28 13:45:44 Saved credentials configuration to: _output/manifests/openshift-ingress-operator-cloud-credentials-credentials.yaml
2021/04/28 13:45:45 Role arn:aws:iam::000000000000:role/sc-example-openshift-cluster-csi-drivers-ebs-cloud-credentials created
2021/04/28 13:45:45 Saved credentials configuration to: _output/manifests/openshift-cluster-csi-drivers-ebs-cloud-credentials-credentials.yaml
  • Copy the generated manifest files and tls directory from sts-preflight/_output directory to installation directory:
# cp sts-preflight/_output/manifests/* sc-scs/manifests/
# cp -a sts-preflight/_output/tls sc-scs/
  • I ran both ./sts-preflight token and ./sts-preflight assume again to make sure I have enough time to finish my installation
  • Export the AWS environment variables.
  • I did not further restrict the role in my test.
  • Start to provision a OCP cluster:
# ./openshift-install create cluster --log-level=debug --dir=./sc-sts
...
INFO Install complete!
INFO To access the cluster as the system:admin user when using 'oc', run 'export KUBECONFIG=/root/mufg-sts/sc-sts-test/auth/kubeconfig'
INFO Access the OpenShift web-console here: https://console-openshift-console.apps.sc-sts-test.xx.live
INFO Login to the console with user: "kubeadmin", and password: "xxxxxxxxxxx"
DEBUG Time elapsed per stage:
DEBUG     Infrastructure: 7m28s
DEBUG Bootstrap Complete: 11m6s
DEBUG  Bootstrap Destroy: 1m21s
DEBUG  Cluster Operators: 12m28s
INFO Time elapsed: 32m38s

#Cluster was created successfully.
  • Verify the components are assuming the IAM roles:
# oc get secrets -n openshift-image-registry installer-cloud-credentials -o json | jq -r .data.credentials | base64 --decode
[default]
role_arn = arn:aws:iam::000000000000:role/sc-sts-test-openshift-image-registry-installer-cloud-credentials
web_identity_token_file = /var/run/secrets/openshift/serviceaccount/token
  • Adding and deleting worker node works as well:
Increase the count from one of the MachineSets from Administrator console, worker node was able to provisioned.
Decrease the count from one of the MachineSets from Administrator console, worker node was deleted.

Delete the Cluster

  • Obtain a new temporary credential:
cd <sts-preflight directory>
# ./sts-preflight token
2021/04/29 08:19:01 Token written to _output/token

# ./sts-preflight assume
Run these commands to use the STS credentials
export AWS_ACCESS_KEY_ID=<temporary key>
export AWS_SECRET_ACCESS_KEY=<temporary secret>
export AWS_SESSION_TOKEN=<session token>
  • Export all AWS environment variables using the result output from last step
  • Delete the cluster:
# ./openshift-install destroy cluster --log-level=debug --dir=./sc-sts-test
DEBUG OpenShift Installer 4.7.9
DEBUG Built from commit fae650e24e7036b333b2b2d9dfb5a08a29cd07b1
INFO Credentials loaded from default AWS environment variables
DEBUG search for matching resources by tag in us-east-1 matching aws.Filter{"kubernetes.io/cluster/sc-sts-rj4pw":"owned"}
...
INFO Deleted                                       id=vpc-0bbacb9858fe280f9
INFO Deleted                                       id=dopt-071e7bf4cfcc86ad6
DEBUG search for matching resources by tag in us-east-1 matching aws.Filter{"kubernetes.io/cluster/sc-sts-test-rj4pw":"owned"}
DEBUG search for matching resources by tag in us-east-1 matching aws.Filter{"openshiftClusterID":"ab9baacf-a44f-47e8-8096-25df62c3b1dc"}
DEBUG no deletions from us-east-1, removing client
DEBUG search for IAM roles
DEBUG search for IAM users
DEBUG search for IAM instance profiles
DEBUG Search for and remove tags in us-east-1 matching kubernetes.io/cluster/sc-sts-test-rj4pw: shared
DEBUG No matches in us-east-1 for kubernetes.io/cluster/sc-sts-test-rj4pw: shared, removing client
DEBUG Purging asset "Metadata" from disk
DEBUG Purging asset "Master Ignition Customization Check" from disk
DEBUG Purging asset "Worker Ignition Customization Check" from disk
DEBUG Purging asset "Terraform Variables" from disk
DEBUG Purging asset "Kubeconfig Admin Client" from disk
DEBUG Purging asset "Kubeadmin Password" from disk
DEBUG Purging asset "Certificate (journal-gatewayd)" from disk
DEBUG Purging asset "Cluster" from disk
INFO Time elapsed: 4m39s

References

Oops, I deleted my project on an Azure Red Hat OpenShift (ARO) cluster!

A customer ran into issues backing up and restoring their projects on the ARO cluster. So I figure it is time to run a quick test on this and see where the issues are. After testing for the customer, I decided to share my discovery from my test and hope to save time for others.

The use case is very simple here. We want to back up a project and restore the way things are if I delete the project.

My environment

  • ARO 4.12.25
  • Velero v1.11.1
  • Azure CLI 2.50

Set up ARO for test

  • Installing the ARO cluster is straightforward, and if you have the latest version of azure-cli, you can add ‘–version’ to specify the OpenShift version under the latest version supported in the ARO lifecycle [2].
  • Install or update the azure-cli version as shown.
$ az version
{
  "azure-cli": "2.50.0",
  "azure-cli-core": "2.50.0",
  "azure-cli-telemetry": "1.0.8",
  "extensions": {}
}
  • I followed the reference [1] to create an ARO cluster the 4.11.44 and upgrade to 4.12.25.
  • Deploy a stateful application to the cluster that uses Persistent Volume Claim (PVC).

Set up to run Velero

  • Install Velero CLI per [3]
$ velero version
Client:
Version: v1.11.1
Git commit: -
Server:
Version: v1.11.1
  • I followed the reference [3] to set up the Azure account and blob container.
  • Also, use the instruction to create a service principal for Velero to access the storage.

Now, we are ready to install Velero onto the ARO cluster

In the ARO backup and restore documentation [3], it uses “velero/velero-plugin-for-microsoft-azure:v1.1.0”. I learned I must use “velero/velero-plugin-for-microsoft-azure:v1.5.0” to restore my PVC data properly. My inspiration is from reference [5].

Here are the steps I did to backup & restore:

  • Add data to my application for testing. My application pod uses a PVC
  • Files are added to the directory /var/demo_files
  • Now, I am ready to back up my application
$ velero backup create backup-2 --include-namespaces=ostoy --snapshot-volumes=true --include-cluster-resources=true
Backup request "backup-2" submitted successfully.
Run `velero backup describe backup-2` or `velero backup logs backup-2` for more details.

$ velero backup describe backup-2
Name:         backup-2
Namespace:    velero
Labels:       velero.io/storage-location=default
Annotations:  velero.io/source-cluster-k8s-gitversion=v1.25.11+1485cc9
              velero.io/source-cluster-k8s-major-version=1
              velero.io/source-cluster-k8s-minor-version=25

Phase:  Completed


Namespaces:
  Included:  ostoy
  Excluded:  <none>

Resources:
  Included:        *
  Excluded:        <none>
  Cluster-scoped:  included

Label selector:  <none>

Storage Location:  default

Velero-Native Snapshot PVs:  true

TTL:  720h0m0s

CSISnapshotTimeout:    10m0s
ItemOperationTimeout:  1h0m0s

Hooks:  <none>

Backup Format Version:  1.1.0

Started:    2023-07-28 13:06:42 -0700 PDT
Completed:  2023-07-28 13:07:06 -0700 PDT

Expiration:  2023-08-27 13:06:42 -0700 PDT

Total items to be backed up:  2089
Items backed up:              2089

Velero-Native Snapshots:  1 of 1 snapshots completed successfully (specify --details for more information)
  • Check if the backup is completed.
$ oc get backup backup-2 -n velero -o yaml
  • And the status will report as completed
status:
  completionTimestamp: "2023-07-28T20:07:06Z"
  expiration: "2023-08-27T20:06:42Z"
  formatVersion: 1.1.0
  phase: Completed
  • Now let’s delete the application
$ oc delete all --all -n ostoy; oc delete pvc ostoy-pvc; oc delete project ostoy
  • Let’s restore it from the backup-2
$ velero restore create restore-2 --from-backup backup-2
Restore request "restore-2" submitted successfully.
Run `velero restore describe restore-2` or `velero restore logs restore-2` for more details.

$ velero restore describe restore-2
Name:         restore-2
Namespace:    velero
Labels:       <none>
Annotations:  <none>

Phase:                                 InProgress
Estimated total items to be restored:  128
Items restored so far:                 100

Started:    2023-07-28 13:12:22 -0700 PDT
Completed:  <n/a>

Backup:  backup-2

Namespaces:
  Included:  all namespaces found in the backup
  Excluded:  <none>

Resources:
  Included:        *
  Excluded:        nodes, events, events.events.k8s.io, backups.velero.io, restores.velero.io, resticrepositories.velero.io, csinodes.storage.k8s.io, volumeattachments.storage.k8s.io, backuprepositories.velero.io
  Cluster-scoped:  auto

Namespace mappings:  <none>

Label selector:  <none>

Restore PVs:  auto

Existing Resource Policy:   <none>
ItemOperationTimeout:       1h0m0s

Preserve Service NodePorts:  auto
  • Let’s check if the restore is completed
$ oc get restore restore-2 -n velero -o yaml
  • Wait for the status shows as completed.
  • Now, we can check the project and application data are restored.
  • All pods are running, and the added data is restored below.

When using “velero/velero-plugin-for-microsoft-azure:v1.1.0” for Velero, I could not restore the data from the PVC. By using “velero/velero-plugin-for-microsoft-azure:v1.5.0” for Velero, I can now restore the application on the same ARO cluster and the application data.

Reference

Way too many alerts? Which alerts are important?

OpenShift provides ways to observe and monitor cluster health. When we have more clusters, we want to monitor all clusters from a centralized location. We can use Red Hat Advanced Cluster Management (RHACM) helps to manage and control all the clusters from a single console. Also, we can enable observability from ACM to observe all clusters from RHACM.

The biggest complaint I got is that we are getting so many alerts. How do we really know when and how to react to the alerts that my organization cares about?

This is my example of how I will start tackling the issue. I am going to share the steps here on how I set up my OpenShift environment to try to solve the problem.

Environment:

  • OpenShift 4.11
  • Red Hat Advanced Cluster Management Operator 2.7

My test environment

  • Install OpenShift 4.11
  • Install Red Hat Advanced Cluster Management Operator 2.7

Click the OperatorHub from the OpenShift console left menu -> click on “Advanced Cluster Management for Kubernetes” Tile -> click install

  • Once RHACM is installed and create “MultiClusterHub” customer resource (CR)

Enable the Observability

  • Prepare an S3 bucket. In my case, I used AWS for my object storage.
aws s3 mb s3://shchan-acm
  • Create “open-cluster-management-observability” namespace
oc create namespace open-cluster-management-observability 
  • Create “pull-secret” in the namespace
DOCKER_CONFIG_JSON=`oc extract secret/pull-secret -n openshift-config --to=-`

oc create secret generic multiclusterhub-operator-pull-secret \
    -n open-cluster-management-observability \
    --from-literal=.dockerconfigjson="$DOCKER_CONFIG_JSON" \
    --type=kubernetes.io/dockerconfigjson
  • Create a YAML file as below and name it “thanos-object-storage.yaml.” The credential will need to have proper permission to access the bucket. I am using an IAM user that has full access to the bucket. See the reference section for permission details.
apiVersion: v1
kind: Secret
metadata:
  name: thanos-object-storage
  namespace: open-cluster-management-observability
type: Opaque
stringData:
  thanos.yaml: |
    type: s3
    config:
      bucket: shchan-acm
      endpoint: s3.us-east-2.amazonaws.com
      insecure: true
      access_key: xxxxxxxxxxxxxxxxx
      secret_key: xxxxxxxxxxxxxxxxxxxxxxxxxxxxxxxxxx
  • Create the secret for object storage
oc create -f thanos-object-storage.yaml -n open-cluster-management-observability
  • Create MultiClusterObservability customer resource in a YAML file, multiclusterobservability_cr.yaml.
apiVersion: observability.open-cluster-management.io/v1beta2
kind: MultiClusterObservability
metadata:
  name: observability
spec:
  observabilityAddonSpec: {}
  storageConfig:
    metricObjectStorage:
      name: thanos-object-storage
      key: thanos.yaml
  • Run the following command to create the CR
oc apply -f multiclusterobservability_cr.yaml

Create custom rule

The use case here is to get a notification for a given issue when it happens. Since every alert is sent to the same notifier. It is not easy to react to the important alert.

  • Create a “kube-node-health” group for alerting when any node is down for any reason. Create a Configmap “thanos-ruler-custom-rules” with the following rules in the open-cluster-management-observability namespace. Add “custom_rules.yaml” in the data section of the YAML file. Noted that I added “tag: kubenode” in the labels section. Note that it can be any label. This is just an example.
data:
 custom_rules.yaml: |
   groups:
     - name: kube-node-health
       rules:
       - alert: NodeNotReady
         annotations:
           summary: Notify when any node on a cluster is in NotReady state
           description: "One of the node of the cluster is down: Cluster {{ $labels.cluster }} {{ $labels.clusterID }}."
         expr: kube_node_status_condition{condition="Ready",job="kube-state-metrics",status="true"} != 1
         for: 5s
         labels:
           instance: "{{ $labels.instance }}"
           cluster: "{{ $labels.cluster }}"
           clusterID: "{{ $labels.clusterID }}"
           tag: kubenode
           severity: critical
  • You can view the logs from one of the alert manager pods to monitor if the rules are applied correctly. You can check if the log has any errors.

To test the alert from the ACM console

  • Shut down one worker node
  • Go to ACM
  • Click Infrastucture -> Cluster -> Grafana
  • Login the grafana dashboard
  • Click “Explore”
  • Click “Metrics browser to expand
  • Select “alertname” and all the and “NodeNotReady” alert shows up under the list
  • Here the alert was fired because one of the nodes was down.

Let’s configure the alert manager

We want to send this “NodeNotReady” alert to a specific Slack channel.

  • Extract the data from the “alertmanager-config secret.
oc -n open-cluster-management-observability get secret alertmanager-config --template='{{ index .data "alertmanager.yaml" }}' |base64 -d > alertmanager.yaml
  • Edit the alert-manager.yaml file as the following example. Note that I have 2 Slack channels for 2 receivers, respectively. One for the specific “tag: kubenode” alert and the other one for all the rest alerts.
"global":
  "slack_api_url": "https://hooks.slack.com/services/TDxxxx3S6/B0xxxxZLE2D/BN35PToxxxxmRTRxxxxN6R4"

"route":
  "group_by":
  - "alertname"
  "group_interval": "5m"
  "group_wait": "30s"
  "repeat_interval": "12h"
  "receiver": "my-team"
  "routes":
  - "match":
      "tag": "kubenode"
    "receiver": "slack-notification"

"receivers":
- "name": "slack-notification"
  "slack_configs":
  - "api_url": "https://hooks.slack.com/services/TDxxxx3S6/B0xxxxUK7B7/vMtVpxxxx4kESxxxxeDSYu3"
    "channel": "#kubenode"
    "text": "{{ range .Alerts }}<!channel> {{ .Annotations.summary }}\n{{ .Annotations.description }}\n{{ end }}"


- "name": "my-team"
  "slack_configs":
  - "api_url": "https://hooks.slack.com/services/TDxxxx3S6/B0xxxxZLE2D/BN35PToxxxxmRTRxxxxN6R4"
    "channel": "#critical-alert"
    "text": "{{ .GroupLabels.alertname }}"
  • Save the alertmanager.yaml and replace the secret.
oc -n open-cluster-management-observability create secret generic alertmanager-config --from-file=alertmanager.yaml --dry-run=client -o=yaml |  oc -n open-cluster-management-observability replace secret --filename=-
  • When the Node is shut down, a message should show in the slack channel like the one below.
  • You will also see many alerts show up on the other channel, like the one below.

The idea here is to get meaningful alerts to the team and know what to do with the alerts.

The next is to continue to refine the customer rules and alert manager configuration per the needs.

Reference

Application Data Replication

My use case is to replicate the stateful Springboot application for disaster recovery. The application runs on OpenShift, and we want to leverage the existing toolsets to solve this problem. If it is just replicating the data from one data center to another, it should be super simple, right? In this blog, I share my journey of picking my solution.

The requirements are:

  • No code change
  • Cannot use ssh to copy the data
  • Cannot run the pod for replication using privileged containers
  • Must meet the security requirements

Solution 1: Writing the data to object storage

The simplest solution would be to have the application write the data to an object bucket, so we can mirror the object storage directly. However, it requires code changes for all the current applications.

Solution 2: Use rsync replication with VolSync Operator

We tested will the rsync-based replication using VolSync Operator. This will not be a good choice because it violates security policies on using SSH and UID 0 within containers.

Solution 3: Use rsync-tls replication with VolSync Operator

This is the one that meets all the requirements, and I am testing it out.

My test environment includes the following:

  • OpenShift (OCP) 4.11
  • OpenShift Data Foundation (ODF) 4.11
  • Advanced Cluster Security (ACS) 3.74.1
  • VolSync Operator 0.70

Setup

  • Install two OCP 4.11 clusters
  • Install and configure ODF on both OCP clusters
  • Install and configure ACS central on one of the cluster
  • Install and configure ACS secured cluster on both cluster
  • Install VolSync Operator on both clusters
  • Install a sample stateful application

Configure the rsync-tls replication CRs on the source and destination clusters

On the secondary cluster, under the namespace of the application

  • Click “Installed Operators” > VolSync
  • Click the “Replication Destination” tab
  • Click “Create ReplicationDestination” and select the “Current namespace only” option
  • On the Create ReplicationDestination screen, select YAML view
  • Replace the only “spec” section in the YAML with the below YAML
spec:
 rsyncTLS:
   accessModes:
     - ReadWriteMany
   capacity: 1Gi
   copyMethod: Snapshot
   serviceType: LoadBalancer
   storageClassName: ocs-storagecluster-cephfs
   volumeSnapshotClassName: ocs-storagecluster-cephfsplugin-snapclass

Notes:
The serviceType is LoadBalancer. see Reference [2] for more details on picking the Service Type. Since I am using ODF, ocs-storagecluster-cephfs and ocs-storagecluster-cephfsplugin-snapclass are the storageClassName and volumeSnapshotClassName, respectively.

  • Check the status from the ReplicationDestination CR; the update should be similar, as shown below.
status:
 conditions:
   - lastTransitionTime: '2023-03-29T06:02:42Z'
     message: Synchronization in-progress
     reason: SyncInProgress
     status: 'True'
     type: Synchronizing
 lastSyncStartTime: '2023-03-29T06:02:07Z'
 latestMoverStatus: {}
 rsyncTLS:
    address: >-
      a5ac4da21394f4ef4b79b4178c8787ea-d67ec11e8f219710.elb.us-east-2.amazonaws.com
    keySecret: volsync-rsync-tls-ostoy-rep-dest

Notes:
We will need the value of the address and the keySecret under the “rsyncTLS” section to set up the source cluster for replication.

  • Copy the keySecret from the destination cluster to the source cluster
  • Log in to the destination cluster, and run the following command to create the psk.txt file.
oc extract secret/volsync-rsync-tls-ostoy-rep-dest --to=../ --keys=psk.txt -n ostoy
  • Log in to the source cluster, and execute the following command to create the keySecret.
oc create secret generic volsync-rsync-tls-ostoy-rep-dest --from-file=psk.txt -n ostoy
  • Now you are ready to create the ReplicationSource.
  • Log in to your source cluster from the UI
  • Click “Installed Operators” > VolSync
  • Click the “Replication Source” tab
  • Click “Create ReplicationSource” and select the “Current namespace only” option
  • On the Create ReplicationSource screen, select YAML view
  • Replace the only “spec” section in the YAML with the below YAML
spec:
  rsyncTLS:
    address: >-
      a5ac4da21394f4ef4b79b4178c8787ea-d67ec11e8f219710.elb.us-east-2.amazonaws.com
    copyMethod: Clone
    keySecret: volsync-rsync-tls-ostoy-rep-dest
  sourcePVC: ostoy-pvc
  trigger:
    schedule: '*/5 * * * *'

I am using the address that was provided to me from the status of the ReplicationDestination CR and using the same keySecret that was from the destination.

  • On the destination OCP console, click “Storage” > VolumeSnapShots, and you will see a snapshot has been created.

  • Click “PersistentVolumeClaims”. There is a copy PVC from the source created under the namespace where you create your ReplicationDestination CR. Note the name of the PVC “volsync-ostoy-rep-dest-dst” here.
  • Let’s add some new content to the application on the source cluster.
  • Scale down the deployment for this application on the source
  • On the destination cluster, ensure the application uses “volsync-ostoy-rep-dest-dst” as the PVC in the deployment.
  • Deployment of the sample application on the Destination
  • Check the application and verify the new content was copied to the Destination.
  • The last task is verifying if the solution violates policies using SSH and UID 0.
  • Log in to the ACS console and enable the related policies.
  • Check if any related policies are violated under the application namespace and search by namespace from the violation menu.

References:

Getting Started on OpenShift Compliance Operator

There are many documents out there on the OpenShift Compliance Operator. I share this with customers who want to learn how to work with OpenShift Operator and helped them to get started on the OpenShift Compliance Operator.

In this blog, I will walk you through how to generate the OpenSCAP evaluation report using the OpenShift Compliance Operator.

OpenShift Compliance Operator can be easily installed on OpenShift 4 as a security feature with the OpenShift Container Platform. The Compliance Operator uses OpenSCAP, a NIST-certified tool, to scan and enforce security policies provided by the content.

Prerequisites

Overview

The compliance operator uses many custom resources. The diagram below helps me to understand the relationship between all the resources. In addition, the OpenShift documentation has details about the Compliance Operator custom resources.

Steps to Generate OpenSCAP Evaluation Report

Some default custom resources come as part of the compliance operator installation, such as ProfileBunble, Profiles, and ScanSetting.

First, we need to create the ScanSettingBinding, which defines the Profiles and the ScanSetting. The ScanSettingBinding tells Compliance Operator to evaluate for Profile(s) A with the specific scan setting.

  • Log in OpenShift Cluster
# oc login -u <username> https://api.<clusterid>.<subdomain>
# oc project openshift-compliance
  • The default compliance profiles will be available once the operator is installed. The command below lists out all compliance profiles Custom Resource Definition (CRD) profiles.compliance.openshift.io.
# oc get profiles.compliance.openshift.io
  • To get custom resource ScanSetting via the below command. It shows two default scan settings.
# oc get ScanSetting
NAME                 AGE
default              2d10h
default-auto-apply   2d10h
  • Check out the “default” ScanSetting
Name:         default
Namespace:    openshift-compliance
Labels:       <none>
Annotations:  <none>
API Version:  compliance.openshift.io/v1alpha1
Kind:         ScanSetting
Metadata:
  Creation Timestamp:  2021-10-19T16:22:18Z
  Generation:          1
  Managed Fields:
...
  Resource Version:  776981
  UID:               f453726d-665a-432e-88a9-a4ad60176ac7
Raw Result Storage:
  Pv Access Modes:
    ReadWriteOnce
  Rotation:  3
  Size:      1Gi
Roles:
  worker
  master
Scan Tolerations:
  Effect:    NoSchedule
  Key:       node-role.kubernetes.io/master
  Operator:  Exists
Schedule:    0 1 * * *
Events:      <none>
  • Create ScanSettingBinding as shown in scan-setting-binding-example.yaml below.
# cat scan-setting-binding-example.yaml
apiVersion: compliance.openshift.io/v1alpha1
kind: ScanSettingBinding
metadata:
  name: cis-compliance
profiles:
  - name: ocp4-cis-node
    kind: Profile
    apiGroup: compliance.openshift.io/v1alpha1
  - name: ocp4-cis
    kind: Profile
    apiGroup: compliance.openshift.io/v1alpha1
settingsRef:
  name: default
  kind: ScanSetting
  apiGroup: compliance.openshift.io/v1alpha1
  • Create the above sample ScanSettingBinding custom resource.
# oc create -f scan-setting-binding-example.yaml
  • Verify the creation of the ScanSettingBinding
# oc get scansettingbinding
  • Custom resource ComplianceSuites is to help tracking the state of the scans. The following command is to check the state of the scan you defined in your ScanSettingBinding.
# oc get compliancesuite
NAME             PHASE     RESULT
cis-compliance   RUNNING   NOT-AVAILABLE
  • ComplianceScan custom resource needs all the parameters to run OpenSCAP, such as profile id, image to get the content from, and data stream file path. It also can constain operational parameter.
# oc get compliancescan
NAME                   PHASE   RESULT
ocp4-cis               DONE    NON-COMPLIANT
  • While the custom resource ComplianceCheckResult shows the aggregate result of the scan, it is useful to review the raw result from the scanner. The raw results are produced in the ARF format and can be large. Therefore, Compliance Operator creates a persistent volume (PV) for the raw result from the scan. Let’s take a look if the PVC is created for the scan.
# oc get pvc
NAME                   STATUS   VOLUME                                     CAPACITY   ACCESS MODES   STORAGECLASS   AGE
ocp4-cis               Bound    pvc-5ee57b02-2f6b-4997-a45c-3c4df254099d   1Gi        RWO            gp2            27m
ocp4-cis-node-master   Bound    pvc-57c7c411-fc9f-4a4d-a713-de91c934af1a   1Gi        RWO            gp2            27m
ocp4-cis-node-worker   Bound    pvc-7266404a-6691-4f3d-9762-9e30e50fdadb   1Gi        RWO            gp2            28m
  • Once we know the raw result is created, we need the oc-compliance tool to get the raw result XML file. You will need to login to the registry.redhat.io.
# podman login -u <user> registry.redhat.io
  • Download the oc-compliance tool
podman run --rm --entrypoint /bin/cat registry.redhat.io/compliance/oc-compliance-rhel8 /usr/bin/oc-compliance > ~/usr/bin/oc-compliance
  • Fetch the raw results to a temporary location (/tmp/cis-compliance)
# oc-compliance fetch-raw scansettingbindings cis-compliance -o /tmp/cis-compliance
Fetching results for cis-compliance scans: ocp4-cis-node-worker, ocp4-cis-node-master, ocp4-cis
Fetching raw compliance results for scan 'ocp4-cis-node-worker'.....
The raw compliance results are available in the following directory: /tmp/cis-compliance/ocp4-cis-node-worker
Fetching raw compliance results for scan 'ocp4-cis-node-master'.....
The raw compliance results are available in the following directory: /tmp/cis-compliance/ocp4-cis-node-master
Fetching raw compliance results for scan 'ocp4-cis'...........
The raw compliance results are available in the following directory: /tmp/cis-compliance/ocp4-cis
  • Inspect the output filesystem and extract the *.bzip2 file
# cd /tmp/cis-compliance/ocp4-cis
# ls
ocp4-cis-api-checks-pod.xml.bzip2

# bunzip2 -c  ocp4-cis-api-checks-pod.xml.bzip2  > /tmp/cis-compliance/ocp4-cis/ocp4-cis-api-checks-pod.xml

# ls /tmp/cis-compliance/ocp4-cis/ocp4-cis-api-checks-pod.xml
/tmp/cis-compliance/ocp4-cis/ocp4-cis-api-checks-pod.xml
  • Convert ARF XML to html
# oscap xccdf generate report ocp4-cis-api-checks-pod.xml > report.html
  • View the HTML as shown below.

Reference

Thank you Juan Antonio Osorio Robles for sharing the diagram!

Argocd SSO Set up

  • Go to Administrator Console
  • Create a new project called keycloak
  • Click Operator
  • Click OperatorHub
  • Click on the Red Hat Single Sign-On Operator
  • Click Install
  • Click Install
  • Click “Create instance” in the Keycloak tile
  • The Keycloak CR is shown below
apiVersion: keycloak.org/v1alpha1
kind: Keycloak
metadata:
  name: keycloak-dev
  labels:
    app: keycloak-dev
  namespace: keycloak
spec:
  externalAccess:
    enabled: true
  instances: 1
  • Click Create
  • Go to Workloads > Pods
  • Click the keycload-dev creation and return “true”
$ oc get keycloak keycloak-dev -n keycloak -o jsonpath='{.status.ready}'
true
  • Operators > Installed Operators > Red Hat Single Sign-On Operator
  • Click Create instance
  • Enter the KeycloakRealm as shown below
apiVersion: keycloak.org/v1alpha1
kind: KeycloakRealm
metadata:
  name: keycloakrealm
  labels:
    realm: keycloakrealm
  namespace: keycloak
spec:
  instanceSelector:
    matchLabels:
      app: keycloak-dev
  realm:
    enabled: true
    displayName: "Keycloak-dev Realm"
    realm: keycloakrealm
  • Click Create
  • Make sure it returns true
$ oc get keycloakrealm keycloakrealm -n keycloak -o jsonpath='{.status.ready}'
true
  • Get the Keycloak Admin user secret name
$ oc get keycloak keycloak-dev --output="jsonpath={.status.credentialSecret}"
credential-keycloak-dev
  • Get the Admin username and password
$ oc get secret credential-keycloak-dev -o go-template='{{range $k,$v := .data}}{{printf "%s: " $k}}{{if not $v}}{{$v}}{{else}}{{$v | base64decode}}{{end}}{{"\n"}}{{end}}'
  • Run the following to find out the URLs of Keycloak:
KEYCLOAK_URL=https://$(oc get route keycloak --template='{{ .spec.host }}')/auth &&
echo "" &&
echo "Keycloak:                 $KEYCLOAK_URL" &&
echo "Keycloak Admin Console:   $KEYCLOAK_URL/admin" &&
echo "Keycloak Account Console: $KEYCLOAK_URL/realms/myrealm/account" &&
echo ""
  • Open a browser with the Admin URL
  • Login with the admin username and password
  • Click Client on the left nav
  • Click Create on the right top corner
  • Enter the Argocd URL and the name of the client as ‘argocd’
  • Click Save
  • Set Access Type to confidential
  • Set Valid Redirect URIs to <argocd-url>/auth/callback
  • Set Base URL to /applications
  • Click Save
  • Scroll up and click “Credential” tab
  • IMPORTANT: Copy the secret and you will need this later
  • Configure the Group claim
  • Click Client Scope on the left nav
  • Click Create on the right
  • Set Name as group
  • Set Protocol as openid-connecgt
  • Display On Content Scope: on
  • Include to Token Scope: on
  • Click save
  • Click “Mappers” tab
  • Click Create on the top right
  • Set name as groups
  • Set Mapper Type as Group Membership
  • Set Token Claim Name as groups`
  • Click Clients on the left nav
  • Click argocd
  • Click “Client Scopes” tab
  • Select groups > Add selected
  • Click Groups on left nav
  • Click Create
  • Set the name as ArgoCDAdmins
  • Click Save
  • Encode the argocd credential you saved before
echo -n '<argocd credential>' | base64
  • Edit the argocd-secret
oc edit secret argocd-secret -n openshift-gitops
  • add the “oidc.keycloak.clientSecret: <encoded credential> as shown below.
apiVersion: v1
kind: Secret
metadata:
  name: argocd-secret
data:
  oidc.keycloak.clientSecret: <encoded credential>
  • Edit argocd Custom Resource
oc edit argocd -n openshift-gitops
  • Add the following into the yaml. Make sure update the issuer to make your settings
oidcConfig: |
    name: OpenShift Single Sign-On
    issuer: https://keycloak-keycloak.apps.cluster-72c5r.72c5r.sandbox1784.opentlc.com/auth/realms/keycloakrealm
    clientID: argocd
    clientSecret: $oidc.keycloak.clientSecret
    requestedScopes: ["openid", "profile", "email", "groups"]
  • From OpenShift Console top right corner, click About
  • Copy the API URL from the following screen
  • Go back to Keycloak, click Identity Providers on left nav
  • Select OpenShift v4 from the dropdown list
  • Set Display Name: Login with Openshift
  • Set Client ID: keycload-broker
  • Set Client Secret: <anything that you can remember>
  • Set Base URL: API URL
  • Set Default Scopes: user:full
  • Click Save
  • Add an Oauth Client
oc create -f <(echo '
kind: OAuthClient
apiVersion: oauth.openshift.io/v1
metadata:
 name: keycloak-broker 
secret: "12345" 
redirectURIs:
- "https://keycloak-keycloak.apps.cluster-72c5r.72c5r.sandbox1784.opentlc.com/auth/realms/keycloakrealm/broker/openshift-v4/endpoint" 
grantMethod: prompt 
')
  • Configure the RBAC
oc edit configmap argocd-rbac-cm -n openshift-gitops
  • Modify the data as shown below
apiVersion: v1
kind: ConfigMap
metadata:
  name: argocd-rbac-cm
data:
  policy.csv: |
    g, ArgoCDAdmins, role:admin
  • Go to the Argocd URL, you will see the SSO icon. Click “LOG IN VIA OPENSHIFT”
  • Click Log in Openshift

Red Hat OpenShift on Amazon (ROSA) is GA!

I have previously blogged about the pre-GA ROSA, and now it is GA. I decided to write up my GA experience on ROSA.

Let’s get started here.

Enable ROSA on AWS

After logging into AWS, enter openshift in the search box on the top of the page.

Click on the “Red Hat OpenShift Service on AWS” Service listed.

It will then take you to a page as shown below and click to enable the OpenShift service.

Once it is complete, it will show Service enabled.

Click to download the CLI and click on the OS where you run your ROSA CLI. It will start downloading to your local drive.

Set up ROSA CLI

Extract the downloaded CLI file and rosa add to your local path.

tar zxf rosa-macosx.tar.gz
mv rosa /usr/local/bin/rosa

Setting AWS Account

I have set up my AWS account as my IAM user account with proper access per the documentation. There is more information about the account access requirements for ROSA. It is available here.

I have configured my AWS key and secret in my .aws/credentials.

Create Cluster

Verify AWS account access.

rosa verify permissions

Returns:

I: Validating SCP policies...
I: AWS SCP policies ok

Verify the quota for the AWS account.

rosa verify quota --region=us-west-2

Returns:

I: Validating AWS quota...
I: AWS quota ok

Obtain Offline Access Token from the management portal cloud.redhat.com (if you don’t have one yet) by clicking Create One Now link

Go to https://cloud.redhat.com/openshift/token/rosa, and you will have to log in and prompt to accept terms as shown below.

Click View Terms and Conditions.

Check the box to agree the terms and click Submit.

Copy the token from cloud.redhat.com.

rosa login --token=<your cloud.redhat.com token>

Returns:

I: Logged in as 'your_username' on 'https://api.openshift.com'

Verify the login

rosa whoami

Returns:

AWS Account ID:               ############
AWS Default Region:           us-west-2
AWS ARN:                      arn:aws:iam::############:user/username
OCM API:                      https://api.openshift.com
OCM Account ID:               xxxxxyyyyyzzzzzwwwwwxxxxxx
OCM Account Name:             User Name
OCM Account Username:         User Name
OCM Account Email:            name@email.com
OCM Organization ID:          xxxxxyyyyyzzzzzwwwwwxxxxxx
OCM Organization Name:        company name
OCM Organization External ID: 11111111

Configure account and make sure everyone setup correctly

rosa init

Returns

I: Logged in as 'your_username' on 'https://api.openshift.com'
I: Validating AWS credentials...
I: AWS credentials are valid!
I: Validating SCP policies...
I: AWS SCP policies ok
I: Validating AWS quota...
I: AWS quota ok
I: Ensuring cluster administrator user 'osdCcsAdmin'...
I: Admin user 'osdCcsAdmin' already exists!
I: Validating SCP policies for 'osdCcsAdmin'...
I: AWS SCP policies ok
I: Validating cluster creation...
I: Cluster creation valid
I: Verifying whether OpenShift command-line tool is available...
I: Current OpenShift Client Version: 4.7.2

Creating cluster using interactive mode.

rosa create cluster -i
I: Interactive mode enabled.
Any optional fields can be left empty and a default will be selected.
? Cluster name: [? for help] 

Enter the name of the ROSA cluster.

? Multiple availability zones (optional): [? for help] (y/N) 

Enter y/N.

? AWS region:  [Use arrows to move, type to filter, ? for more help]
  eu-west-2
  eu-west-3
  sa-east-1
  us-east-1
  us-east-2
  us-west-1
> us-west-2 

Select the AWS region and hit <enter>.

? OpenShift version:  [Use arrows to move, type to filter, ? for more help]
> 4.7.2
  4.7.1
  4.7.0
  4.6.8
  4.6.6
  4.6.4
  4.6.3

Select the version and hit <enter>.

? Install into an existing VPC (optional): [? for help] (y/N)

Enter y/N.

? Compute nodes instance type (optional):  [Use arrows to move, type to filter, ? for more help]
> r5.xlarge
  m5.xlarge
  c5.2xlarge
  m5.2xlarge
  r5.2xlarge
  c5.4xlarge
  m5.4xlarge

Select the type and hit <enter>.

? Enable autoscaling (optional): [? for help] (y/N)

Enter y/N.

? Compute nodes: [? for help] (2)

Enter the numbers of workers to start.

? Machine CIDR: [? for help] (10.0.0.0/16)

Enter the machine CIDR or use default.

? Service CIDR: [? for help] (172.30.0.0/16)

Enter the service CIDR or use default.

? Pod CIDR: [? for help] (10.128.0.0/14)

Enter the pod CIDR or use default.

? Host prefix: [? for help] (23)

Enter the host prefix or use default

? Private cluster (optional): (y/N) 

Enter y/N.

Note:

Restrict master API endpoint and application routes to direct, private connectivity. You will not be able to access your cluster until you edit network settings in your cloud provider. I also learned that you would need one private subnet and one public subnet for each AZ for your existing private VPC for the GA version of ROSA. There will be more improvement to provide for the private cluster in the future release.

Returns:

I: Creating cluster 'rosa-c1'
I: To create this cluster again in the future, you can run:
   rosa create cluster --cluster-name rosa-c1 --region us-west-2 --version 4.7.2 --compute-nodes 2 --machine-cidr 10.0.0.0/16 --service-cidr 172.30.0.0/16 --pod-cidr 10.128.0.0/14 --host-prefix 23
I: To view a list of clusters and their status, run 'rosa list clusters'
I: Cluster 'rosa-c1' has been created.
I: Once the cluster is installed you will need to add an Identity Provider before you can login into the cluster. See 'rosa create idp --help' for more information.
I: To determine when your cluster is Ready, run 'rosa describe cluster -c rosa-c1'.
I: To watch your cluster installation logs, run 'rosa logs install -c rosa-c1 --watch'.
Name:                       rosa-c1
ID:                         xxxxxxxxxxyyyyyyyyyyyaxxxxxxxxx
External ID:
OpenShift Version:
Channel Group:              stable
DNS:                        rosa-c1.xxxx.p1.openshiftapps.com
AWS Account:                xxxxxxxxxxxx
API URL:
Console URL:
Region:                     us-west-2
Multi-AZ:                   false
Nodes:
 - Master:                  3
 - Infra:                   2
 - Compute:                 2 (m5.xlarge)
Network:
 - Service CIDR:            172.30.0.0/16
 - Machine CIDR:            10.0.0.0/16
 - Pod CIDR:                10.128.0.0/14
 - Host Prefix:             /23
State:                      pending (Preparing account)
Private:                    No
Created:                    Mar 30 2021 03:10:25 UTC
Details Page:               https://cloud.redhat.com/openshift/details/xxxxxxxxxxyyyyyyyyyyyaxxxxxxxxx
 

Copy the URL from the Details Page to the browser and click view logs to see the status of the installation.

When ROSA is completed, you will see the similar page as below.

You will need to access the OpenShift cluster.

Configure Quick Access

Add cluster-admin user

rosa create admin -c rosa-c1

Returns:

I: Admin account has been added to cluster 'rosa-c1'.
I: Please securely store this generated password. If you lose this password you can delete and recreate the cluster admin user.
I: To login, run the following command:

   oc login https://api.rosa-c1.xxxx.p1.openshiftapps.com:6443 --username cluster-admin --password xxxxx-xxxxx-xxxxx-xxxxx

I: It may take up to a minute for the account to become active.

Test user access

$ oc login https://api.rosa-c1.xxxx.p1.openshiftapps.com:6443 --username cluster-admin --password xxxxx-xxxxx-xxxxx-xxxxx
Login successful.

You have access to 86 projects, the list has been suppressed. You can list all projects with 'oc projects'

Using project "default".

Configure Identity Provider

There are options for identity providers. I am using Github in this example.

I am not going to explain how to get identity to provide set up here. I did that in last blog. I will walk through the step to configure ROSA using Github.

rosa create idp --cluster=rosa-c1 -i
I: Interactive mode enabled.
Any optional fields can be left empty and a default will be selected.
? Type of identity provider:  [Use arrows to move, type to filter]
> github
  gitlab
  google
  ldap
  openid

Select one IDP

? Identity provider name: [? for help] (github-1)

Enter the name of the IDP configured on the ROSA

? Restrict to members of:  [Use arrows to move, type to filter, ? for more help]
> organizations
  teams

Select organizations

? GitHub organizations:

Enter the name of the organization. My example is `sc-rosa-idp`

? To use GitHub as an identity provider, you must first register the application:
  - Open the following URL:
    https://github.com/organizations/sc-rosa-idp/settings/applications/new?oauth_application%5Bcallback_url%5D=https%3A%2F%2Foauth-openshift.apps.rosa-c1.0z3w.p1.openshiftapps.com%2Foauth2callback%2Fgithub-1&oauth_application%5Bname%5D=rosa-c1&oauth_application%5Burl%5D=https%3A%2F%2Fconsole-openshift-console.apps.rosa-c1.0z3w.p1.openshiftapps.com
  - Click on 'Register application'

Open a browser and use the above URL to register the application and cope client ID

? Client ID: [? for help] 

Enter the copied Client ID

? Client Secret: [? for help]

Enter client secret from the registered application.

? GitHub Enterprise Hostname (optional): [? for help] 

Hit <enter>

? Mapping method:  [Use arrows to move, type to filter, ? for more help]
  add
> claim
  generate
  lookup

Select claim

I: Configuring IDP for cluster 'rosa-c1'
I: Identity Provider 'github-1' has been created.
   It will take up to 1 minute for this configuration to be enabled.
   To add cluster administrators, see 'rosa create user --help'.
   To login into the console, open https://console-openshift-console.apps.rosa-c1.xxxx.p1.openshiftapps.com and click on github-1.

Congratulation! IDP configuration is completed.

Login in with IDP account

Open a browser with the URL from the IDP configuration. Our example is: https://console-openshift-console.apps.rosa-c1.xxxx.p1.openshiftapps.com.

Click github-1

Click Authorize sc-rosa-idp

Overall, it is straightforward to get started on creating a ROSA cluster on AWS. I hope this will help you in some ways.

Reference

Red Hat OpenShift on Amazon Documentation

Running ROSA on an Existing Private VPC

Pre-GA ROSA test

Test Run Pre-GA Red Hat OpenShift on AWS (ROSA)

I have an opportunity to try out the pre-GA ROSA. ROSA is a fully managed Red Hat OpenShift Container Platform (OCP) as a service and sold by AWS. I am excited to share my experience on ROSA. It installs OCP 4 from soup to nuts without configuring hosted zone and domain sever. As a developer, you may want to get the cluster up and running, so you can start doing the real work :). There are customization options with ROSA, but I am going to leave it for later exploration.

I am going to show you the steps I took to create OCP via ROSA. There are more use cases to test. I hope this blog will give you a taste of ROSA.

Creating OpenShift Cluster using ROSA Command

Since it is a pre-GA version, I download the ROSA command line tool from the here and have aws-cli available where I run the ROSA installation.

  • I am testing from my MacBook. I just move the “rosa” command line tool to /usr/local/bin/.
  • Verify that your AWS account if it has the necessary permissions using rosa verify permissions:
  • Verify that your AWS account has the necessary quota to deploy an Red Hat OpenShift Service on AWS cluster via rosa verify quota --region=<region>:
  • Log in your Red Hat account with ROSA command using rosa login --token=<token from cloud.redhat.com>:
  • Verify the AWS setup using rosa whoami:
  • Initialize the AWS for the cluster deploy via rosa init:
  •  Since I have OpenShift Client command line installed, it shows the existing OpenShift Client version. If you don’t have it, you can download the OpenShift Client command line via rosa download oc and make it available from your PATH. 
  • Create ROSA via rosa create cluster command below: 

Note: rosa create cluster -i with the interactive option, it provides customization for ROSA installation, such as multiple AZ, existing VPC, subnets, etc…

  • Copy the URL from Details Page to a browser and you can view the status for your ROSA installation. 
  • If you click View logs, you can watch the log from here until the cluster is completed.
  • When you see this screen, it means the cluster is created:
  • Now, you need to have a way to log into the OCP cluster. I created an organization called sc-rosa-idp on Github via rosa create idp --cluster=sc-rosa-test --interactive as show below.
  • Log into the OCP console via the URL from the output from last step:
  • Click github-1 –> redirect to authorize to the organization from Github -> log in Github.
  • Once you log in with your Github credential, we will see the OCP developer console: 
  • Grant cluster-admin role to the github user using rosa grant user cluster-admin --user <github user in your organization> --cluster <name of your rosa cluster>.
  • Click Administrator on the top left and access the OCP admin console with Admin access as shown below:

Delete ROSA

  • Go to the cluster from cloud.redhat.com, from Action –> select Delete cluster:
  • Enter the name of the cluster and click Delete:
  • The cluster shows as Uninstalling


Although it is a pre-GA without AWS console integration, I found it very easy to get my cluster up and running. If you cannot wait for GA, you can always request the preview access from here. Get a head start with ROSA!

References